There’s an art and science to building a good trail. From the quality of the natural materials used to the positioning and grading of the trail, designing trails requires a combination of creativity and precision. A big part of that design process involves deciding where to put trail markers to keep hikers from veering off course without spoiling the wilderness experience!
The purpose of a trail marker, or ‘blaze,’ is to lead hikers along a defined path and encourage people to fully immerse themselves in nature without worrying about getting lost.
This guide will show you how to recognize and interpret the different varieties of hiking trail blazes, markers, and trail signage used in the United States, along with backup wilderness navigation methods and skills that will come in handy in case you lose your way.
What Is a Trail Blaze?
The purpose of a trail blaze is to help hikers follow a specific path. Blazes indicate important waypoints like where the trail starts and ends, turn-offs, and trail junctions.
How to Interpret Trail Blazes
A trail blaze’s unique language uses symbols, not words. Here are some of the most common trail blazes you may come across and what they mean.
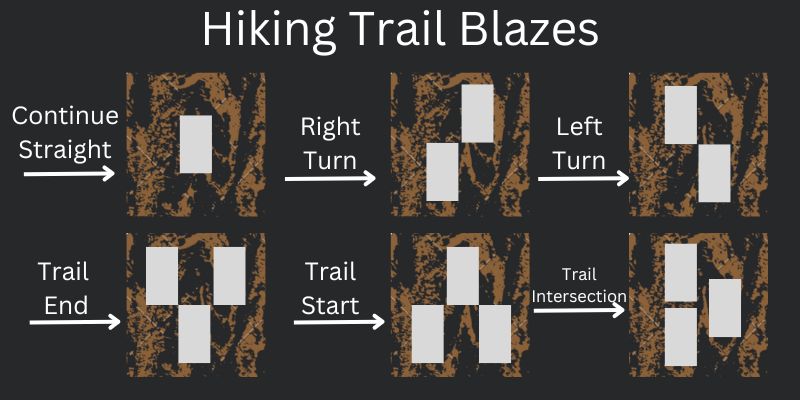
Straight
 If you see a blaze with one rectangle, it means you’re heading in the right direction. Continue straight.
 Right Turn
A right turn is marked by two rectangles that form a right diagonal.
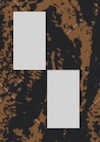 Left Turn
A left turn is indicated by two rectangles that form a left diagonal.
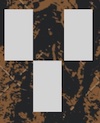
 Trail Junction
A connector trail will be marked with two blazes stacked on top of each other, with a single blaze on the side where the spur trail intersects your current trail.
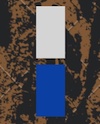 Double Blaze
When you see two blazes stacked on top of one another, it means you’re currently traveling along two trails that overlap with each other. A double blaze can also indicate sharp turn in the trail ahead. Often, this will be two different colors to indicate the color of each trail.
 Start of Trail
Three rectangles forming an upward-pointing arrow or pyramid shape indicates the start of a trail.
 End of Trail
Conversely, three rectangles forming a downward-pointing arrow signal the end of the trail.
Other Common Trail Markers
Blazes come in various shapes and sizes. Besides the classic white blaze, here are some other common trail markers you may encounter.
Cairns
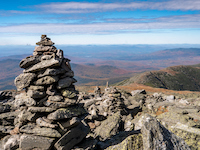 Cairns are stacked rocks that act as trail markers and can be found in most mountainous terrains above treeline where painted blazes are difficult to apply. Cairns are usually tall enough to stand out from their surroundings and help hikers easily navigate difficult terrain.
Cairns found on trails and in the backcountry should generally only be built by park rangers or trail crews. Avoid building rock cairns that could be mistaken for trail markers because this could lead hikers in the wrong direction. Additionally, moving rocks contributes to erosion by exposing loose soil underneath. When a rock is disturbed, an animal loses its potential home, as many insects and mammals burrow under rocks to stay protected and reproduce. Bottom line? Leave the cairn building to the experts.
Ducks

Trail Duck with 5 rocks
A duck is smaller than a cairn, often just three stones high, with a pointer rock or “beak” on top to indicate the direction you need to go.
Posts
 Trail posts are often metal or wooden posts placed near trail junctions, indicating which direction the trail goes. They usually include directional arrows to help hikers stay on track. Posts prove highly useful during winter, providing a clear route when other navigational features are hidden by snow.
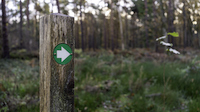
Markers
 As a more durable alternative to painted blazes, some trail crews will fix metal, plastic or wooden trail markers to trees. However, trail markers are more vulnerable to being damaged by wildlife, destroyed by the elements, or stolen by other hikers, making painted blazes a more reliable alternative. Even though they fade over time, painted blazes are harder to remove and have no intrinsic value, making them less likely to be stolen or vandalized.
Flags
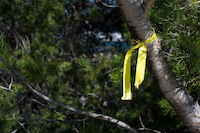 Marking flags are usually tied around a tree trunk to highlight temporary details. Since flags can be quickly and easily put up and taken down, they are ideal for marking rerouted trails. Flags are also easy to spot from a distance, making them an effective tool for marking boundaries or areas of the trail that need attention. Agencies like the USFS will use flags, ribbons or paint to identify diseased or dead trees for removal, thinning projects, weed infestations, and property lines.
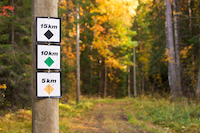
Junctions
 Trail junctions are usually signed and serve as another indication that you’re hiking along the right path. Usually, junction signs feature arrows pointing toward the next junction and list the mileage to the next point of interest. Trail junctions help hikers stay on course, while also letting them know how far they have to hike to reach their destination or camp.
Log/Debris Piles
In the same way that trail blazes show hikers where to go, there are signs on the trail that indicate which areas they should avoid. Trail crews and other hikers will move logs or create stick piles to block off side paths, washes, or game trails that could lead hikers off track.
Trail Blaze Colors
Outside of the Appalachian Trail, many U.S. trails use a standardized color-coding system for their trail blazes. It’s worth mentioning that painted blazes are more commonplace on trails in the eastern U.S. Western trails, including the PCT and CDT, primarily use plastic blazes, posts, cairns, and metal signage to guide hikers. Furthermore, countries outside the United States have their own unique trail marking systems and signage, so don’t expect to rely on the classic white blaze to guide you along the Camino de Santiago.
That said, the standard blaze colors recommended by the Department of Conservation and Natural Resources are red, yellow, blue, and orange. Red blazes indicate shared-use trails open to horseback riders, cyclers, and hikers. Both yellow and orange blazes indicate that the trails are for foot travel only, with the latter used on state forest trails. Finally, cross-country ski trails are indicated by blue blazes.
Essential Skills and Tools to Self-Navigation on the Trail
Staying on trail requires more than an understanding of blazes. Proper navigation skills, understanding the terrain, being aware of your surroundings, and taking precautions against inclement weather can also help you stay safe on trail. Take the guesswork out of navigating the wilderness by brushing up on the following outdoor safety skills.
Study Your Hiking Route Ahead of Time
Before you hit the trail, do your homework and research your route. Use tools like Gaia or AllTrails to give you an overview of the terrain, elevation profile, natural features, and any potential hazards you may encounter on your route. It’s also a good idea to read trip reports and reviews from other hikers who have gone before you. Their experiences can provide valuable insight into current trail conditions and help you prepare for your journey.
Take a Paper Map – And Know How to Read It
Hiking apps like AllTrails, OnX Backcountry, FatMap, Gaia, and FarOut let you download offline maps or track your location without cell service. Even so, you shouldn’t use technology as a crutch in the backcountry. Because when things go wrong in the outdoors, a minor inconvenience can quickly escalate into a survival situation if you’re not prepared.
Technology can and does fail. Paper maps don’t require electricity or a signal, making them a reliable secondary navigation tool in case your phone dies, or you lose it. Learning how to read a topo map can give you an in-depth understanding of the terrain, landmarks, campsites, water sources, and other important features of the region you’ll be traversing.
The U.S. Geological Survey provides a simple guide to common symbols found on topo maps. You can purchase these topo maps from the USGS website, REI or your local outfitter. And if you’re interested in getting hands-on experience, sign up for a navigation class (REI offers outdoor backcountry navigation classes for beginners).
Learn How to Read and Use a Compass
A map and compass are essential items in a hiker’s safety toolkit. If maps provide a visual representation of your surroundings, compasses will help you determine which direction you need to go to return to trail or civilization. Combined, you can use these tools to navigate even the most unfamiliar territory.
With your trusty map and compass, you can orient and guide yourself to your destination, even without a trail to follow. Proper navigation and orienteering knowledge can also help you determine where you are in an emergency situation and guide rescue teams to your approximate location.
Carry the 10 Essentials
In addition to following Leave No Trace Principles, it’s important to bring the right gear with you, whether on a day hike or a long-distance trek to minimize risk and maximize your time in nature. While everyone has their preferences when it comes to what goes in their gear kit, the 10 Essentials are the bare necessities all hikers should carry in their pack no matter how long they plan to be outdoors.
These essential items can help you survive an emergency, such as getting caught in bad weather, losing your bearings, or getting injured on the trail. While it may feel excessive to carry so much stuff on a short hike, even an after-work jaunt on your local hiking trail can lead to trouble if you’re unprepared.
The 10 Essentials are as follows:
- Navigation: This includes but is not limited to a paper map, compass, GPS device, sat-phone, extra batteries or external battery pack.
- Headlamp: Plus extra batteries or a charging cable and external battery pack for rechargeable headlamps.
- Sun protection: Polarized sunglasses, sunscreen, SPF lip balm, hat, and sun-protective clothes.
- First aid kit: Don’t know what should go in your first aid kit? We have a guide for that!
- Multi-tool: For gear repair and first aid.
- Fire: Matches, firestarter, or camp stove.
- Emergency shelter: Like an emergency bivvy or survival blanket.
- Extra food: Pack calorie-dense snacks.
- Extra water: Including a way to treat the water.
- Extra clothes: Bring an extra set of base layers, socks, fleece, and lightweight puffy.
Putting It All Together
Now that you know how to interpret trail blazes and markers, you can put that newfound knowledge to the test as you explore the trails and adventure to your heart’s content! That, combined with additional outdoor navigation skills, like map reading and orienteering, will empower you to hike with confidence and stoke.
And when in doubt, just follow the trail of breadcrumbs – it worked for Hansel and Gretel! Right?

Ash Czarnota is a freelance writer based in Southern California with over 3,000 trail miles under her feet. She is the founder of Go Galavanting, an online community to celebrate adventurous women and highlight emerging thought leaders in the outdoor industry. A PCT alumni, Joshua Tree enthusiast and burgeoning climber, Ash uses her outdoor experiences to craft content that educates and inspires a rising generation of adventurers to embrace their inner wild. Connect with her on Instagram (@salty_millennial).