So you are ready to go on a hike, or trail run? Awesome. But, are you properly prepared? In this article we will do a deep dive into route planning. We’ll cover everything from understanding your own abilities, how to pick a trail, which tools to use, and preparation tasks before embarking on your adventure.
Before Reading On:
We have a few great resources that we want to make sure you have access to in order to answer all your questions.
Beginner’s Guide to Backpacking
Preparing For Your First Backpacking Trip (Gear)
How To Train For Backpacking / Thru-Hike
Our Expertise
We are experienced hikers and backcountry skiers that have planned everything from simple day hikes to multi week hikes with multiple food drops. We put our heads together and determined best practices for trip planning, and will provide you with a step by step guide on how to ensure you never get lost again and have a safe fun experience exploring the great outdoors.
All resources noted in this article have been tested thoroughly throughout the United States, and in British Columbia. Significant amounts of trial and error have gone into curating this list and best practices. If you do not see a resource that you use in this article that does not mean we don’t recommend it, we simply cannot cover every resource out there in one article.
Why Route Planning Is Important
Trip planning is one of the most important aspects of outdoor adventures, and even if you have been to the area multiple times before certain aspects of this article should always be applied to your planning process.
Increased Safety
Proper route planning and education before your trek will help you stay on schedule, and stay safe. Without a plan, it is difficult to tell someone not joining when to expect you to check in and be back, and it can lead to situations that can be dangerous.
Increased Enjoyment
A quality trip plan can also increase enjoyment out of your experience. Having many decisions already made for you, a rough schedule, and the proper preparation you can enjoy the outdoors even more thoroughly. Removing some worries and anxiety due to lack of planning can go a long ways for some.
Common Route Planning Mistakes
Overestimating Fitness
What type of endurance do you have? – all types of endurance are slightly different and just because you can go easily run a 10k doesn’t mean you will be able to crush that distance in the mountains.
This is not meant to hold you back, but instead level set expectations of what your adventure should be before deciding on a route. We want to give you a tool kit that will allow you to push your limits safely, and understand the risk you will be taking on.
To learn about average hiking/backpacking speeds, read our guide and see our hiking time calculator.
What Is An Average Hiking Speed?
Hikers often average between 1 and 3 miles per hour (1.61-4.83 kph). Flat ground averages are closer to 3, while steep ascents move closer to 1. In technical terrain, the speed often drops below 1 mile per hour.
Overestimating Experience Levels
Mountain experience: It is critical to be truthful to yourself about your own experience, and to voice your current experience levels to others that may be planning a trip for or with you.
Here are some key questions you should answer:
- What type of trails have you hiked on? – smooth single track, rocky single track, technical terrain, above / below tree line, class 3 or 4 scrambles
- Are you acclimatized? – altitude can pose significant limitations to people and should always be taken into account.
- Who are you going with? – groups are awesome, but you should be hyper aware of the skill level everyone has so that no one gets pushed over their limit. The trip should be planned to be feasible by the least experienced, and least in shape group members.
Not Considering All Group Member Abilities
As a beginner you should avoid going anywhere too remote, alone. Alone being the key word. If you are going with experienced folks then you may feel more comfortable pushing your limits.
Groups add safety, but they also add complexity to route planning. You need to plan your route such that the person(s) with the least endurance, the least experience in technical terrain, or the least speed is able to accomplish the trip.
Underestimating Altitude
If you already live at elevation then this will play less of a role, but is still important to keep in mind. Moving at 10,000+ feet of elevation is far more difficult than moving at even 6,000 feet. Your pace will be lower, your heart rate will be higher, your body may be consuming more liquids and electrolytes, and you therefore need to take altitude into account.
Altitude affects people very differently, so if you have never been at high altitudes, even if you are a very fit person, your plan should be more cautious in a high altitude zone.
Cut back mileage and elevation gain when planning your route.
If you are coming from sea level to somewhere like Colorado, then you likely want to take it slow and acclimatize before going on any mission too large. One thing that I found helps with acclimatizing is making sure you overhydrate in the days leading up to your arrival, and going on a small hike with some elevation change the day you arrive. This has helped kick start my body into getting used to the new elevation (not something that is medically proven, but through many trials and errors, I have found that it helps me).
Not Knowing The Hiking Class
A class 3, 4, or 5 section of trail is vastly different than your average class 1 or class 2 hiking trail. If you aren’t familiar with this system, read our guide on hiking trail classes.
Not Knowing What Animals Are Indigenous To The Area
Mainly large animals or – bears (specifically grizzlies), large cats (mountain lion, puma, cougar, etc.), snakes, wolves, and / or moose to name a few. Knowing best practices of how to deal with animals you may run into when you see them can save your life. Ie: with black bears you are supposed to get big and talk with an affirmative voice, then if they charge hold your ground – with a moose you are supposed to slowly back away and put a tree in between you, then if you get knocked down ball up until the moose goes on its way – but with a mountain lion fight for your f$*&ing life. Simply put, you should know the best practices for avoiding animal encounters in that specific region, and what to do if you do encounter animals.
Not Researching Weather
Knowing the weather is important for route planning, gear, and safety. Your route may need to change if the forecast is calling for brutal winds, rain, lightning, or other inclement weather. Weather requires the use of backup plans.
Not Understanding Seasonal Trail Conditions
Is the trail going to be snow covered? Icy? Muddy? Wet, or dry? Each of these may require different types of gear (like microspikes and snowshoes), and will alter your ability to move quickly. Your plan needs to take the current trail conditions into account.
Not Researching Trail Types & Difficulty
There are a multitude of trail types and it is important to know what kind of trail you will be on as it will significantly affect your travel time and effort level.
Smooth Single Track
This is the easiest type of trail to hike on as you don’t have to be super aware of your footing making it not very mentally taxing. You can also easily find your stride here. Not having to adjust your stride makes it much easier for you to be efficient. This type of trail is often found below tree line as shown on the image on the left, but in the image on the right you will see smooth single track above tree line.
Technical Single Track
This is often very slow moving terrain as you have to be very careful of your footing or you are liable to roll an ankle or take a tumble. Technical single track is almost solely found below tree line. When you get above tree line in technical terrain it is often not single track as you can pick your own adventure instead of being locked into a specific route.
Above Vs Below Treeline
Hiking above treeline adds new concerns. Wind, incoming weather, rapidly adjusting conditions, and more can rapidly change the experience near or above treeline. With any inclement weather or conditions, above treeline routes can be slowed down significantly, and additional gear may be needed for wind, precipitation, and cooler temperatures. If lightning is in the forecast please do not go above treeline. Lightning often strikes the tallest object in the area, and when above tree line you are the tallest object.
Bushwhacking
AKA no trail. Not a lot of trails you look at will involve this but it is an important call out as there are extra considerations to take into account with this type of travel. This will be the slowest moving type of terrain as there is no set path for you to go along, and navigation skills are necessary. Trails with lots of bushwhacking are not recommended without experienced group members.
Route Planning Tips & Considerations
Create Goals & Objectives
What do you want to experience on your trip? Do you want to push your physical limits? Do you want to hit certain summits? Do you want to see waterfalls? Big cliffs? Wildlife? In order to narrow down to a specific region, a specific state, and then a specific location within a region, you need to have an idea of what you are looking for. Once you’ve answered the following questions – you can look for a route:
- How much time do you have?
- How far are you willing to travel?
- What type of terrain or wildlife do you want to experience or avoid?
- Is there a location or region you need to stick to? If so, you’ve narrowed your options a lot.
- How much distance and elevation can you or do you want to cover in the allotted time?
- Do you need to avoid certain technical terrain or hiking classes?
How To Find Routes?
Online Tools
There are a massive amount of websites and apps to help adventurers find hikes. These websites here have hike finder tools that cover a few of the U.S. states, but larger tools cover the entire world. Here are only a few of our favorites:
- Gaia GPS
- FatMap
- OnXBackcountry
- AllTrails
- CalTopo
- Hiking Project
Friends / Friends of Friends
Current local knowledge (beta) will almost always outweigh anything you can find online. If someone is experienced and knows the area well they will generally be able to give you a few recommendations based on your skill level.
Local Outdoor Shops
This is typically an overlooked one, but the people who work here are often locals who love the outdoors. Give them a little information about yourself (don’t go overboard) and most of the time they will open up and give you multiple areas / trails, dos and don’ts of the area, and current beta. I have personally done this multiple times and it works great! Note, even if you are the most badass person on the planet, be humble and understand that you are an outsider coming onto their local trails.
YouTube
I love using this as a tool because it gives you so much more information than a picture. Oftentimes the creator is taking videos throughout their journey and you can see them progressively get more and more tired letting you know what state you may be in when you reach a specific point on the trail. Additionally, commentary is often helpful in gaining a better understanding of the trail as they will typically do it after they come through a hard part of the adventure.
When looking for YouTube videos, I try to find the most current one I can as it gives me the most up to date view of what the trail looks like. Note, if you are going on a hike during the winter and the only video you can find is from someone during summer it will not be very helpful as conditions will be drastically different, but if you can find someone video from the same time a year ago it will provide you with more useful information (snowpack is generally different so keep that in mind if your area is over or under average snowfall for that time).
Social Media
On social media, you can search for specific areas, mountains, trails, and more to find recent posts. Many people post locations – and those that don’t, messaging nicely can help you find out where these spots are.
In addition, this can give you helpful information on trail conditions. If you don’t have enough info, you can message people that visited that area and ask. This can be a very effective way to get updates on trail conditions that can’t easily be found otherwise.
Local Hiking Groups
In addition to individual people, social media platforms like Facebook or Meetup often have local groups that have tons of information, knowledge, and people who are willing to help out. Joining these online groups can connect you with great people, and also give you great information.
Search Engines
Simply Google for best hikes (or insert other activity) in your area and you will be flooded with a slue of ideas. I generally like to look at a handful of different sites to zero in on what is similar as there is often overlap. Not that I am biased, but here’s a few great hike ranking articles.
It is important to know that most locations have websites or apps tailored specifically to those regions.
Consider Water And Nutrition
When planning your route where you can’t carry all the water you need, you’ll need to make sure you have access to water for filtering. This can be a river, small stream, lake, or even snow if you plan on boiling. Simply put, there are parts of the country or world, where water access is limited, and this is a very important consideration for route planning.
Ensuring you have the proper nutrition is key to make sure you avoid bonking. Nutrition is a broad and deep topic so we will not do a deep dive into it here, but in general you want to make sure you are replenishing your carbs, fats, electrolytes (paricularly salt), and for quicker hits of energy, sugar. Read our guide to hiking and backpacking food here.
Quality Weather Forecasts
When hiking or backpacking, you often cover distance, and alter your elevation, which can greatly impact the forecast. Because forecasts can differ, it is recommended to check multiple forecasts. Some of our favorites:
Wunderground: this site is great for finding the weather at the trailhead and along the route (if you are going through or near a town). My favorite view is the 10 day forecast as it gives you all the information you’ll need. Wunderground is the first site I go to as it gives me a general idea of what precipitation, temperature, and wind will be in a given area. From here I like to get more specific and look at the weather on the mountain/s I’ll be going to.
Mountain-Forecast.com: this site is the best I have found at forecasting what precipitation, temperature, and wind will be at various elevations on mountains. I put my full trust into this site and it has never led me astray. It is extremely important to understand what weather will be like at the peak as it is often much colder, and windier than at the base especially if you are going above tree line. I’ve found best way to navigate this site is by googling the mountain, state, and “weather” (ie: mount baldy Utah weather).
Route Planning Tools
Route planning is a bit different than finding trails. Route planning involves mapping out the route once you’ve decided on a location. The below tools are some of our favorites, however, there are many more. Most of the below have free versions, which are all you need to plan routes, but paid versions to actually save or download a route and have it available on your mobile device without service.
FatMap
FatMap is an interactive hiking app and website designed to help people explore the outdoors. The app provides users with an immersive 3D topography of popular trails and mountains around the world, giving them access to high-resolution maps, detailed information about routes and features, as well as live tracking of their adventure. With FatMap, you can plan your route before you hit the trail, follow your progress in real time, search for nearby points of interest, and easily share your trip with friends. Check out FatMap to find out more.
AllTrails
AllTrails is a popular hiking app designed to help users explore trails and outdoor areas around the world. The app provides detailed maps with helpful information such as elevation, photos, and reviews from other hikers (recent trail conditions). You can also sync data from your GPS tracker or smartphone onto the map and record routes for others to explore. Additionally, AllTrails has options for filtering the search by activities such as running, biking, paddling, and snow sports. Explore AllTrails here.
OnxBackcountry
OnXBackcountry is a robust app and site for hikers and outdoor enthusiasts. With OnXBackcountry, you get access to detailed maps of just about anywhere in North America. You can easily search for trails and points of interest with their interactive topography, add notes to your maps while out on the trail, and use satellite imagery to scout terrain in remote areas. The app also provides helpful tools like weather forecasts, navigation, waypoints tracking, scheduling reminders, and more.
CalTopo
Caltopo is an incredibly useful website for planning hiking and backpacking routes. It has a comprehensive array of mapping tools with options for printing large-scale topographic maps, selecting satellite imagery, or generating elevation profiles. It also allows you to easily draw your own routes with waypoints and track logs, measure distances, and export data in a variety of formats. Whether you’re doing day hikes or multi-day backpacking trips, Caltopo makes it easy to map out your route in advance so you can focus on the adventure ahead.
Gaia GPS
Gaia GPS is an extremely solid tool for planning routes for hiking and backpacking adventures (both phone app and website version). It features topographical maps with a variety of layers to choose from, making it easy to plan out your route in advance and customize it for your specific needs. Additionally, Gaia GPS has an integrated trip planner that helps you quickly outline distances and elevation gains along your route, as well as track logs to record where you have been. With offline maps and plenty of options for customizing map styles, Gaia GPS is the perfect tool for anyone looking to explore the great outdoors.
Other Tools
These are just a few of the great tools in the marketplace, however, there are dozens of others.
Route Planning Step By Step Guide
- Decide your general vicinity based off of your trip goals and objectives. (See section above)
- Research that location via friends, family, local outfitters, and online tools. (See section above)
- Find the route / location on one of the recommended route planning tools. (See section above)
- Map out the route. You may find pre-established routes, or use a tool to draw and customize a route for you. If applicable, mark the camping locations, water stops, side objectives, notable locations, etc
- Adjust the route to your specific needs and preferences.
- Once finalized, download the route and map to your phone so that it can be accessed without cellular service. GPS capabilities will allow you to see your location overlaid on these maps if downloaded to your device.
- Share the route with everyone in your party, and solidify the plan.
- Share the entire plan with someone who is not joining. Let them know when they should hear from you, and tell them what to do if they don’t hear from you by then.
Route planning For Free
The tools we recommended all allow you to plan a route for free. Where the challenge lies is downloading that route to your phone to overlay your route over your current GPS location so that you can see exactly where you are on a map of your choice without cellular service.
In order to do this, you have to pay for every application. BUT, here is a simple workaround for you.
We highly recommend just paying for the application you enjoy the most, but we do not want you to not go into the backcountry unsafe because you are unwilling to pay for one of these solutions.
Here is how you can do this for FREE.
- Use one of these tools to plan your route (Caltopo, Gaia GPS, OnX, FatMap)
- Once your route and points are all mapped out – download the GPX file. Unsure how? Google it.
- Go to CalTopo (if you planned the route on Caltop – skip this step) – and upload the GPX file to CalTopo. Read how here.
- Go to print your Map on CalTopo. (Hit the print button). Instead of printing, download the Geospacial PDF. Open the map on your screen. (You’ll see a scannable QR code at the bottom right).
- Download the Free App, Avenza Maps. Link here.
- Open Avenza Maps. Find the upload button, and you’ll see a QR code button. Click the QR code button.
- Scan your Caltopo QR code in the Avenza Maps app.
- Boom, you have your map on your phone that pinpoints your location. You have 5 free maps on Avenza, so you can delete old maps not in use.
Be sure to edit your map to have everything you need, or make multiple maps.
Conclusion
Now that you have an understanding of your abilities, weather, necessary gear, animals to watch out for, and water, it is time to make a decision on which trail to choose. Taking everything into account we always recommend taking the safest trail that you can (which will vary based on experience level). Additionally, we recommend either downloading the route to your smartphone, garmin (or other navigation device), and having a paper map of the area in case your devices fail.
Always always always be prepared when you go into the wilderness. More important than anything, is that you make it back home. Be safe, have fun, and don’t forget to enjoy the view!
Appendix
See a few visual examples on how to use the above noted tools:
FatMap
Navigation on the app/website is very easy – your page will likely load with the left pop out already displayed but if it does not click on the globe in the upper left corner then click on the activity you want to explore.
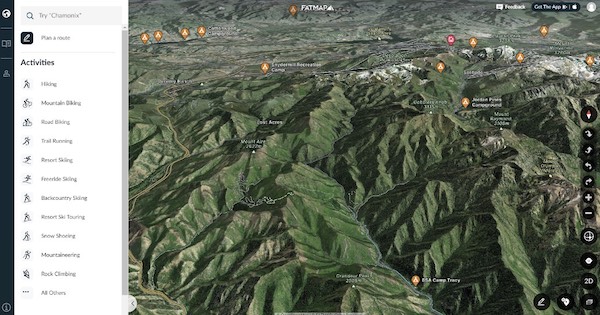
- For this example we chose Hiking. The left pop up will then change giving you all the routes available in your current view. To explore different areas you just need to click and drag on the map to explore and new routes will automatically pop up (same as Alltrails). When you hover over a route on the left hand pop up it will also highlight it on the map as shown below.
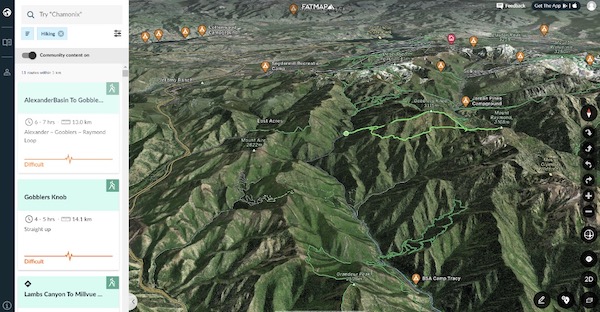
- You can then click on the route (either in the pop up or on the map) and get more detail. Note, not all the trails have much detail so a lot of the time I will use fat maps to find a cool looking trail then google the route to get more detail on what it actually entails.
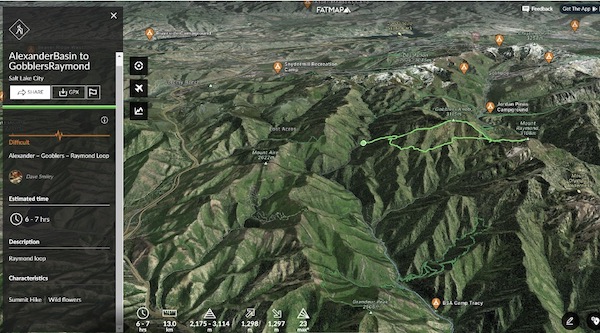
- Other cool features include:
- You don’t have to pay in order to download gpx files! This is awesome as you can use the free version of Alltrails then find the route on Fatmap and download it meaning you don’t have to pay for anything.
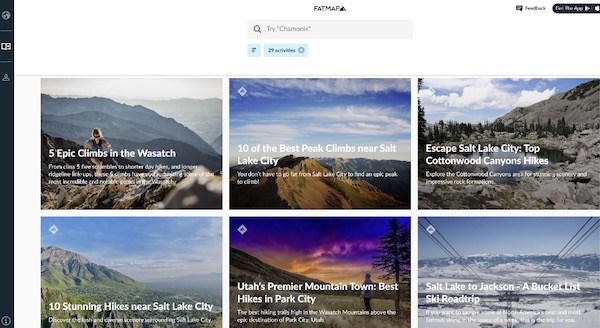
- Instead of clicking on the globe click on the book in the left hand tab and you will be given curated guide books for different areas. I really like using this tool to find new hikes (and tours) just note that these will be fairly popular routes as they are generally top x / best routes in an area. Something to keep in mind if you were hoping to find a trail that is secluded these will not be them (most of the time).
- Overlays – when in the map view you can click on the hamburger in the bottom right as shown and then be given the additional pop up.
AllTrails
- Start by using the explore tab in the top left of the desktop version, which takes you to a map view.
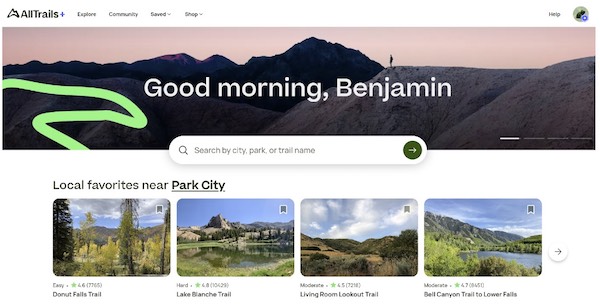
- From here start setting filters based on what you are looking for.
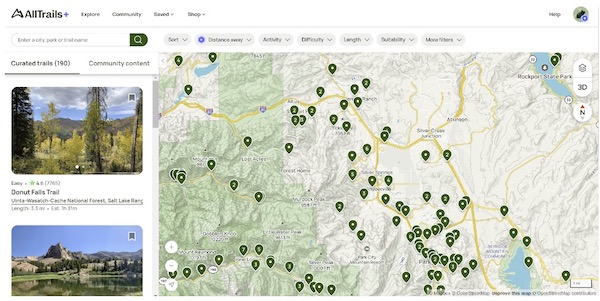
Most of the time I just use the Activity, Length, Route Type (in More Filters as I prefer loops), and Trail Traffic (in More Filters as I prefer trails without a lot of people).
- From here I like to use my cursor and hover over different trails. If I am even slightly interested I will open the trail in a new tab, and start to build a list of trails I am interested in. Once I have all the trails I am interested in opened I start going through them tab by tab.
- When viewing a trail I like to look at the elevation profile on the bottom and all trail descriptions on the left hand side of the screen.
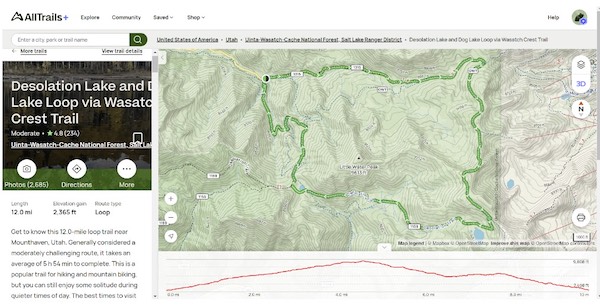
I also look at photos, specifically looking for recent photos to try and get an idea of what current trail conditions are. Generally, I do not like to look at the reviews as you don’t know someone’s experience level meaning you could be getting drastically incorrect beta.
Along with this I am often looking at hikes in different areas meaning there will be different weather in each location / weather will roll in at different times during the day. See below for weather tools I have found to be the most reliable regardless of where I am in the US or Canada.
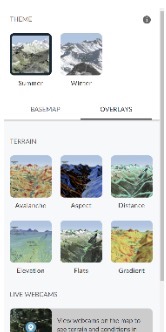
This is where you can change basemap and overlays. Anything that has the explore logo next to or above means you have to pay for it (I have not found much need for any of the paid basemaps or overlays).
This is what the overlays look like and are extremely useful especially during winter / mud season travel (or if you are going to high elevations where there is snow). I really like to use the avalanche and aspect overlays to understand the grade and direction of terrain I am getting into.
Howdy – my name is Ben! A mountain transplant from Houston, TX with a passion for pushing my limits. As a weekend warrior I enjoy spending time in the mountains skiing, touring, trail running, backpacking, speed flying, and taking life one step slower.
As an Eagle Scout I have been honing my outdoor skills since a very early age, and look forward to using that knowledge to help you push your limits and enjoy the outdoors in a safe / fun manner.
By week I work for a digital marketing and production start up handling finance / accounting, legal, and company strategy.
Connect with me on Instagram (_bendoingthings_)