Fly fishing has been undergoing something of a popularity renaissance; in 2020, about 7.8 million people went fly fishing in the U.S. This number was up by 42% from the 5.5 million who fly fished just 10 years earlier, and up 20% from 2016’s numbers. With the wealth of information, guides, and fun fly techniques out there, there’s never been a better time to start fly fishing! But where do you begin?
If you’re a beginner at fly fishing, one thing you need to know is that there are major differences between fishing with dry flies and wet flies– although they aren’t always fished separately. (Don’t worry, we’ll discuss when you’ll use both at once.) While wet flies sit in the water column, dry flies sit just atop it.
Wet Fly and Dry Fly Key Differences
| Wet Flies | Dry Flies | |
| Position | Sink below the water’s surface | Float on the water’s surface |
| Line | Fluorocarbon leaders for better sinking. Sinking fly line is sometimes used while streamer fishing. | Monofilament leaders and tippet to help keep afloat. Floating fly line is always used. |
| Technique | Generally a natural drift, streamers, often with added action. | Casting the fly to rising fish and letting it drift naturally on the surface, occasional mending for better presentation. |
| Visibility of a Strike | Strike indicators help identify when a fish has taken a fly presented underwater | Easy for anglers to see when a fish takes the fly, as it’s visible on the water’s surface |
| Versatility | Fish are nearly always feeding under water, in every season. | Fish only feed on the surface a small percentage of the time, and weather and seasons can greatly affect this. |
| Imitates | Aquatic insects, larvae, nymphs, or small fish that are found underwater | Adult insects, like mayflies, caddisflies, or midges, found on or near the surface of the water |
Now that you know the kind of fly you’re dealing with, let’s dive into a masterclass of the tips, tricks, and techniques you will need as a beginner in dry fly fishing.
If you want to dig deeper on this topic, read our complete guide to dry flies vs wet flies.
Major Gear
You need specialized gear for fly fishing, but don’t go overboard yet! You’ll have plenty of time to get into higher-end, more advanced gear options as you spend more time in the hobby and decide it’s for you. For beginners, it’s best to start simple. You’ll need a fly rod, a reel, fly line, tippet, flotant, a fly box and flies, and potentially some waders. (If you go wet wading when it’s warm, you can just go in shorts and a pair of good sandals.) While you’ll need to buy a fly box and flies, all of the other equipment can be rented from fly shops and fishing outfitters so that you can try before you buy.
Fly Rod and Fly Reel
If you want to get your own equipment, you will find it easier to go with a good rod and reel combo rather than shopping separately. There are many great beginner rod and reel combos out there, and one of our favorites is the Orvis Encounter. You can even get complete fly fishing outfits that include the rod, reel, fly line, leader, tippets and flies. These packages can be convenient for beginners as they ensure that all components are compatible and ready to use.
When shopping for a beginner fly rod, you should look for a rod that has user-friendly characteristics, like moderate action and a length around 8½ to 9 feet. You should also choose a lightweight rod with a comfortable grip to make sure that it feels good in the hand. Choose a rod with a line weight that matches the type of fishing you plan to do. Lighter line weights (3-5) are suitable for small trout streams, while heavier line weights (6-8) are better for larger fish and larger bodies of water. For many beginners, rods that can handle the 3-5 range line weight are a great place to start.
Some rods are designed to be more forgiving and easier to cast, which can be a significant advantage for beginners. Consider trying out a few different rods if possible to find one that feels comfortable and easy to cast.
Remember that the best fly rod for a beginner ultimately depends on your specific needs and preferences. If possible, try casting different rods to see which one feels the most comfortable and suits your casting style. Additionally, consider seeking advice from experienced fly anglers or visiting a local fly shop for personalized recommendations.
Rod Action
Rod action is something that advanced fly fishers obsess over– and beginners should be concerned with it, too. Action is how flexible your rod is, and also describes bend recovery time. A fast-action rod is the stiffest and bends mostly at the tip, while a slow-action rod is more flexible and bends throughout the rod blank. For beginners, you want a happy medium with a moderate or medium-action fly rod. It offers a balance between flexibility and stiffness, making it more forgiving for casting mistakes. Fast-action rods can be more challenging to control for beginners, while slow-action rods aren’t as responsive and have a challenging learning curve.
Waders
Waders are the rubbery fishing overalls that keep you dry when you’re standing in the middle of a trout stream. Chest waders are very popular with fly anglers, and can come with built-in boots or stocking feet that are tucked into your boots. There are plenty of great brands out there that make waders to fit all shapes and sizes of anglers. When looking for waders, it’s important that they fit comfortably and keep you dry. There are lots of great optional features, like waders with attachment points for fly boxes and rod holsters– but comfort and fit are the most important features.
Wading Belt
A wading belt is a belt that anglers wear while wading in rivers, streams, or other bodies of water. You need this to keep water from entering your waders if you happened to fall into the water, and it’s also a handy place to attach a rod holster.
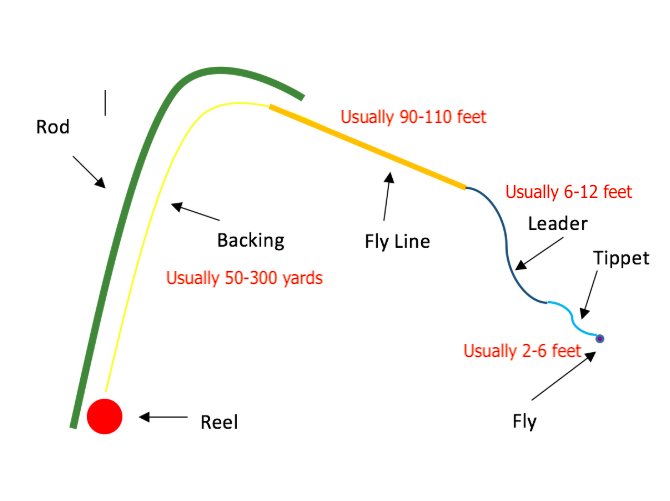
Fly Line, Leader, and Tippet
If you’re familiar with spin fishing, you might be surprised to find out that fly line actually comes in several separate parts. The part that directly attaches to the reel is called backing, and it is generally a very strong braided line. Then, there’s the fly line– a thicker, often tapered line that has some weight to it. Fly line itself provides weight, which makes it possible to cast out distances. Without the weight of fly line, you wouldn’t be able to build up the momentum you need for your cast.
After the fly line comes the leader, and then the tippet. The leader is about 9 feet of clear, tapered line that’s nearly invisible to the fish. The tippet is even shorter, about 3 feet, and even thinner. It directly attaches to the fly and may be treated with floatant to keep it on top of the water. Choosing the right fly line can be complicated, and is one of the reasons many newbies like to choose full fly outfit packages– that way, they don’t have to worry about getting the wrong components.
Fly Box
A fly box is simply a box to keep flies in. These are often quite small, since flies are tiny and light– you will likely take dozens with you on a fishing trip so that you have options in case the fish are picky. Having duplicate flies is also necessary in case of fly loss.
Dry Flies
Choosing the correct flies is an enormous part of fly fishing. For dry flies, it’s important to learn how to “match the hatch,” which means matching the flies you use to the insects that are present in the area. Remember, you’re trying to trick visual predators into taking your bait. This means that it needs to look right! If it doesn’t look like something they want to eat, the fish won’t strike.
To make the right fly choices, you need to know a little bit about entomology– the study of insects. We have a complete guide to fly fishing entomology, so start there when thinking about what fly patterns to take with you. The easiest way to know what flies to use is to check with a local fishing shop or guide. They’ll know what type of insects are emerging and what the fish are willing to bite.
Most dry flies are meant to mimic adult insects– mayflies, caddis flies, midges, and other similar insects. Other dry flies mimic larger, nonaquatic insects that might be swept into the water, like a grasshopper or beetle.
Dry Fly Sizes
Most wet and dry flies for freshwater fishing are outfitted with hooks sizes 12-20, with 20 being the smallest and most delicate. (Fly hooks, like wire gauges, get finer as the number gets higher.) The small size of dry fly hooks makes them particularly challenging to tie, though some anglers enjoy the challenge of creating fine details on a tiny base. You will find larger dry flies however. For example, some grasshopper patterns will be larger to mimic larger grasshoppers. It’s helpful to have multiples of the same fly pattern tied on different hook sizes to give you more options.
Keeping Your Flies Dry
While the perfect cast will put your flies on top of the water, floatant will keep them there. Floatants are substances used to treat dry flies, making them float on the surface of the water. Dry flies are designed to imitate insects that are resting on or hatching from the water’s surface, and it’s crucial that they stay buoyant to appear natural to fish. Floatants help prevent dry flies from becoming waterlogged and sinking, ensuring that they continue to float effectively. You will also see the application of floatant called “dressing” the fly.
There are several types of floatants used in dry fly fishing.
- Gel floatants is the most common type of floatant. This type of floatant is best used as a pretreatment and should be applied to a completely dry fly. Gel floatant will prevent the fly materials from soaking up water and sinking.
- Powder floatant is the best type of floatant to use once your fly has gotten too wet. This type of floatant is a desiccant (drying agent) and will help dry your fly. This type of floatant does not last very long, so it will need to be reapplied frequently. You can also layer gel floatant on top of powder floatant to extend the life of your floatant.
- Brush-on floatant is more time consuming to use, but lasts longer than powder floatant.
- Spray-on floatant is becoming more popular because it’s so easy to use. They can be used while the fly is dry or after it’s gotten wet. This is ideal for larger flies since it produces an even coating.
- Dip and dunk floatant is a two-stage product that lasts a long time and requires infrequent application. This type of product works best as a pretreatment- if you can dip and dunk and let dry for at least five to ten minutes (or longer depending on what the packaging recommends), dip and dunk floatant lasts a long time and gives an even application every time.
- Paste floatants are similar to gel floatants, but much thicker. Past lasts a long time but are challenging to use on small flies, since this type of floatant so thick.
There are many places you should use floatant when fishing with dry flies.
- Before Casting: Apply floatant to your dry fly before making your first cast. This ensures that the fly is prepared to stay afloat throughout your fishing session.
- After Catching Fish: After catching a fish, especially if the fly has been submerged, it’s a good idea to dry it off with, a quick blow from your mouth, or your shirt and then reapply floatant if necessary.
- As Needed During Fishing: While fishing, if you notice that your dry fly starts to sit lower in the water or becomes waterlogged, apply more floatant. You can also use desiccants to revive a saturated fly.
- In Faster Water: Dry fly floatant is particularly crucial when fishing in turbulent water, where even splashes of water or currents what to force flies under the water.
- On Sunny Days: On sunny days, when fish are more likely to rise to the surface to feed on insects, using dry fly floatant becomes especially important to keep your fly riding high on the water.
- With Delicate Flies: Some dry flies are tied with delicate materials that can become waterlogged quickly. In such cases, floatant is essential to maintain the fly’s buoyancy.
Using floatant correctly can significantly improve your success when fishing with dry flies by ensuring they stay on the surface and appear natural to the fish you’re trying to catch. It’s a valuable tool in the fly angler’s arsenal for achieving a natural presentation and enticing fish to rise to the surface.
Dry Fly Techniques
Dry fly fishing relies on placing your fly on the water and then allowing it to move naturally like an insect would. This means that in addition to casting, you need to learn how to mend so that the presentation doesn’t get ruined by the current.
Casting
Fly fishing casts can be elaborate and require precise, measured movements to perfect. If getting out on the water isn’t easy for you, try practicing your cast at home in the backyard. Set up targets and practice putting the fly where you want it. It takes practice to be able to nail a precise, natural presentation every time.
Mending
Mending in fly fishing refers to a set of techniques used to manipulate the fly line and leader on the water’s surface after the fly has been cast. The primary goal of mending is to achieve a drag-free drift of the fly, which is crucial for presenting the fly naturally to the fish and increasing the chances of a successful hookup. Mending helps in controlling the speed, direction, and depth at which the fly drifts on the water.
Presentation Types
Whether you cast upstream or downstream depends on various factors, including the location of the fish, the type of water you’re fishing, and the behavior of the fish you’re targeting. Both upstream and downstream casting have their advantages and disadvantages.
Casting Your Line Upstream
The advantages of upstream casting include:
Long Natural Drift: Casting upstream allows the angler to pull in line potentially for an extended period of time, increasing the length of the natural drift.
Presentation Control: It tends to be easier to mend the line on an upstream cast than far across the river, or downstream.
Reduced Spooking: Casting upstream allows the angler to approach the fish from behind, generally making it easier to avoid spooking the fish.
The disadvantages of upstream casting include:
Spooking with line: Casting upstream means your fly line lands on the water in such a way that it could potentially spook fish that are below or just downstream of the fly line. Usually, casting at an angle to your desired target allows anglers to provent this issue.
Casting Challenges: Anglers need to often quickly strip in line when the fly is quickly drifting back downstream. This can cause challenges with your next cast, as well as challenges if you get a take while you are stripping in line.
Casting Your Line Downstream
The advantages of downstream casting include:
Easier Casting: Casting downstream is often easier as you can cast slightly downstream and let your fly drift to the location simply by letting out more line.
Extremely long drifts are possible: In some cases, anglers can create very long natural drifts by continuing to let out line and letting the fly continue downstream.
The disadvantages of downstream casting include:
Unnatural Drift: Casting downstream can result in a less natural drift of the fly, as it moves unnaturally towards the fish. This can make the presentation less convincing to selective or cautious fish. This can be mitigated through quality mending techniques and positioning while casting.
Missed Hooksets: It can be more challenging to have a quality hook set when setting upstream of a fish.
Cross-Stream Casting
Cross-stream casting, where you cast at an angle relative to the current, offers a compromise between upstream and downstream casting. It is rare where an angler would be casting directly up, or downstream, in almost every cast, an angler is incorporating a slightly cross stream cast. This approach allows you to achieve a relatively natural drift and avoiding spooking fish while maintaining visibility and strike detection.
Ultimately, the choice of casting direction should be based on your assessment of the specific fishing conditions, the behavior of the fish, and your ability as an angler. It’s common for experienced fly anglers to use a combination of upstream, downstream, and cross-stream casting techniques depending on the circumstances to maximize their chances of success.
Hook Setting
Once a fish has taken your fly, you need to set the hook properly before reeling it in. This is both a science and an art. Too fast, and you miss the fish. Too slow, you miss the fish again. Pull in the wrong direction, and you have a bad hookset that can cause you to (you guessed it) miss the fish.
There are two main types of hook setting: strip sets and lift sets. Strip sets involve pulling or stripping the line with a swift motion to set the hook. The strip set should be a quick and deliberate action to ensure the hook penetrates the fish’s mouth. A strip set is generally only used with streamer fishing.
But in many dry fly situations, where the fly is floating on the water’s surface and the fish has gently sipped it, a lift set is often more appropriate. To perform a lift set, gently raise the rod tip in the direction opposite to where the fish’s head is pointing. This helps to drive the hook into the fish’s mouth.
When setting the hook, keep the rod tip low and pointed directly at the fly. This helps in transferring the power of your hook set down the line and into the hook. After setting the hook, maintain tension on the line by keeping it tight. This prevents the fish from shaking the hook loose during the fight.
Beginners often make the mistake of setting the hook way too hard, which can cause line to break. Generally, just a simple lifting of the rod tip is enough. Beginners will often also miss setting the hook by not taking any action. This can give the fish adequate time to spit out the fly, or simply cause a poor hook set which will increase the odds the fish gets off.
Dry Fly Rigs
Your fly rig refers to how many flies are tied to the end of your tippet. If you have a single dry fly rig, you have a single fly tied to the end of your line. This is the most common type of rigging for dry fly fishing and the easiest to use.
The double fly rig is also extremely common. This is just like a single fly rig, except there are two flies to increase the odds of a fish going after one of them. Usually the flies are separated by 12-18 inches of tippet.
A dry dropper rig is a combination of a wet fly and a dry fly. This type of rig has a wet fly at the end of the line, and a dry fly a few feet above it. When submerged, the wet fly behaves in much the same way as it would on a single wet fly rig. Above the submerged wet fly, the dry fly sits atop the water, behaving the same as it would on a single dry fly rig. Should a fish go for your wet fly, the dry fly on the water’s surface acts as your indicator.
The dry dropper rig is one of the most versatile rigs to catch fish in all types of water, and it’s an important asset for many anglers. Even if you’re primarily a dry fly fisher, knowing how to use a dry dropper rig can increase your chances of success and let you have more fun with fly fishing.
Dry fly fishing is a captivating and rewarding pursuit for anglers of all skill levels, including beginners. It offers a unique and thrilling way to connect with nature, test your patience, and sharpen your fishing skills. While the learning curve may seem steep at first, with practice and dedication, you’ll soon find yourself mastering the art of presenting a delicate dry fly to eager trout.

Max DesMarais is the founder of hikingandfishing.com. He has a passion for the outdoors and making outdoor education and adventure more accessible. Max is a published author for various outdoor adventure, travel, and marketing websites. He is an experienced hiker, backpacker, fly fisherman, backcountry skier, trail runner, and spends his free time in the outdoors. These adventures allow him to test gear, learn new skills, and experience new places so that he can educate others. Max grew up hiking all around New Hampshire and New England. He became obsessed with the New Hampshire mountains, and the NH 48, where he guided hikes and trail runs in the White Mountains. Since moving out west, Max has continued climbed all of the Colorado 14ers, is always testing gear, learning skills, gaining experience, and building his endurance for outdoor sports. You can read more about his experience here: hikingandfishing/about