Water is extremely important when you’re backpacking and hiking. It’s one of the most important things to bring with you– but much of the time, you might not actually carry all the water you need with you. If you’re planning on a short hike, you can certainly carry the water you need– but on a backpacking trip that’s a few days long, you’ll need to refill on the trail.
In this article, we’re going to talk about just how to do that. Consider this your ultimate guide to carrying water for hiking.
How Much Water Do I Need Hiking?
A general rule of thumb is to drink one liter per two hours of moderate hiking (0.5 liters per hour). This means that you need to either carry that much water, or have the ability to filter or purify that amount of water to be safe on the trails.
If you plan on doing a hike lasting greater than 6 hours for example, you’ll find that it may be more efficient to bring a water filtration system, rather than carrying 3 liters of water. It is common that beyond the 6 hours mark of moderate level hiking, to carry 2-3 liters of water, and a filtration system to fill up at least once.
Carrying Water
If you’ve never been backpacking before, you might think that you need to carry all of your water with you. But if you’re going on anything other than a relatively short hike, that’s kind of impossible… because water is heavy. Not counting the weight of the bottle, water weighs 2.2 pounds per liter. The amount of water you need to drink depends on many factors, like intensity, humidity, temperature, and more– but a rule of thumb that many hikers go by is to carry 1 liter of water for every 2 hours of hiking.
So let’s say you were planning a weekend trip with 12 hours of actual hiking. That would be minimally 6 liters of water, or 13.2 pounds of water just for the hike– that doesn’t include the water you need for camping. And that’s if everything goes well and the hike isn’t too strenuous!
Instead, what you do if you aren’t carrying all of your water with you is resupply when you’re on the trail. And for many hikers, this means drinking from natural water sources. While that might sound intimidating at first, it’s not so bad– so long as you drink from the right sources and have a filter.
Choosing Natural Water Sources
Before setting out, you must identify potential water sources along your route, taking into account factors such as terrain, elevation, and distance between stops. The selection of natural water sources is the key to having enough water on your hike. Plan your route with consideration for available water sources, and be ready to carry enough water to reach the next reliable refill point. When you’re looking at water sources, here are some key traits to look for:
- Flowing Water: Prioritize streams, rivers, and creeks with a continuous flow to minimize the risk of stagnant water harboring contaminants.
- High Elevation Springs: Opt for springs originating from higher elevations, as the water is less likely to be affected by human and animal activities.
- Clear and Clean Appearance: Choose water that is clear and free from visible debris. While clear water can still harbor contaminants and needs to be filtered or boiled, you’ll be thankful for water without grit in it.
- Downstream Contamination: Refrain from collecting water downstream from human activities or camping areas, minimizing the risk of pollution.
- Natural Filtration: Give preference to water that has passed through sand or gravel, which adds some natural filtration.
- Minimal Animal Presence: Be cautious of water sources with a high concentration of animal tracks or signs, as these may suggest the possibility of fecal contamination.
- Absence of Pollution: Steer clear of water sources displaying signs of pollution, such as oil slicks, discoloration, or unpleasant odors.
Choosing a Water Filter
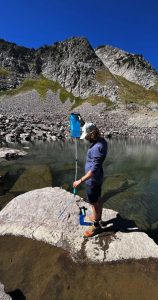
Filling a bottle via a gravity filter at an alpine lake.
Hiking water filters are devices designed to remove impurities, contaminants, and pathogens from natural water sources, making it safe for consumption during hiking or outdoor activities. These filters are essential for ensuring that the water you drink is free from harmful microorganisms and other substances that could cause illness.
Hiking water filters are designed to be lightweight and portable. They are often compact and easy to carry in a backpack, making them ideal for outdoor activities where access to clean water sources may be limited. Regular maintenance is crucial for the effectiveness of water filters. This may involve backflushing the filter, cleaning it, or replacing filter cartridges according to the manufacturer’s instructions. Here are the key features of hiking water filters that will help you choose which type to use.
Filtration Mechanism
Most hiking water filters use a physical filtration mechanism to strain out particles and microorganisms from the water. Common filter media include ceramic, fiberglass, or hollow fiber membranes. Some filters also incorporate activated carbon. This can help improve the taste of the water, as well as absorb bad smells and chemicals.
Some hiking water filters use chemical treatments in combination with physical filtration for added protection. This may involve the use of iodine, chlorine, or other chemicals to kill or neutralize bacteria and viruses.
Type of Filter
Hiking water filters often come in pump or squeeze bottle configurations. Pump systems use a hand pump to force water through the filter, while squeeze systems allow you to squeeze water through the filter with your hands.
Another type of filter is a gravity filter, which relies on the force of gravity to move water through the filter. These systems are often more convenient for filtering larger quantities of water at once.
Microfiltration
Hiking water filters typically provide microfiltration, meaning they can filter out particles and microorganisms down to a certain size, usually measured in microns. This ensures that bacteria, protozoa, and other harmful contaminants are removed. The pore size of the filter determines what size particles it can effectively remove. A smaller micron rating indicates a finer filtration. For example, a filter with a 0.2-micron rating can remove smaller particles than a 0.4-micron filter.
Another way to make sure that your water is safe is to boil it. Bring the water to a rolling boil and let it bubble for at least 1 minute. This has the advantage of being relatively foolproof, but it does mean the water will be hot– and it takes fuel and time to set up. Boiling water is a better choice for when you make camp and have time to let the water cool.
How Much Water Do I Actually Need?
The amount of water you need while hiking can vary based on several factors, and there isn’t a one-size-fits-all answer. As mentioned before, a good general guideline is to aim for around a liter of water per 2 hours of moderate activity in moderate temperatures. On a hot day, aim for 1 liter every hour. This estimate can increase significantly in extreme conditions, or if the hike involves a lot of intense exertion. And of course, some people naturally need more water than others. This is particularly true for hikers who might have health conditions like diabetes or kidney problems, or hikers who are pregnant.
To determine more precisely how much water you need while hiking, consider the following factors:
| Environmental conditions | Hot and dry climates and high altitudes increase water needs |
| Intensity and duration | Longer and more strenuous hikes require more water. |
| Individual factors | Body weight, age, fitness level, and metabolism impact your hydration needs. Listen to your body. |
| Clothing and gear | Wearing heavy clothing or carrying a backpack can increase sweating and the need for more water. |
Start your hike well-hydrated and continue to drink water regularly throughout the journey. Dehydration can impair physical performance and increase the risk of heat-related illnesses.
It’s essential to be flexible and adjust your water intake based on the specific conditions of your hike. Always carry more water than you think you’ll need, especially in remote or challenging environments.
How Should I Carry My Water?
The amount of water carrying capacity you have is limited by what water bottles you bring with you. You should always have at least two ways to carry water– that way, if you lose your water bottle down a ravine or puncture your hydration bladder, you’ll have another way to keep yourself hydrated. It’s a good idea to have at least 4 liters of carrying capacity with you, even if you don’t have all of your hydration carriers filled to capacity at all times.
There are several types of water carriers you can use, each with their own pros and cons. We have a great guide to the best water bottles for hiking if you’d like more information about your water bottle options.
Hard Water Bottles
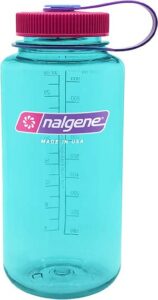
Hard Nalgene water bottle
This is typically what you think of when you picture a water bottle. Hard water bottles are made of many different materials, including insulating steel, durable plastic, and sustainable glass. The downside is that these water bottles can be heavy.
Collapsible Water Bottles
Collapsible water bottles are great if you want to save weight– they’re an excellent backup option for your main water supply. These bottles are made of soft, collapsible silicone or TPU and can even be rolled up for storage if you’re trying to save space.
Hydration Bladders
Hydration bladders or reservoirs are the way to hydrate hands-free. These soft plastic reservoirs fit into your backpack’s hydration reservoir pouch, and a hose snakes out and usually clips to the top of your backpack strap. This means that at any time, you can clamp down on the bite valve and have a drink. Hydration bladders can also hold quite a lot of water and distribute the weight well through your backpack.
So how do these bottle types work for carrying water? Let’s compare them side-by-side.
| Hard Water Bottle | Collapsible Water Bottle | Hydration Bladder | |
| Weight | The heaviest type, but unless you’re looking at double-walled steel, these aren’t too heavy. | Very lightweight. | Very lightweight. |
| Sturdiness | The most durable- some water bottles, like Nalgenes, have lifetime guarantees for their toughness. | Durable, but still vulnerable to punctures. | Durable, but still vulnerable to punctures. |
| Size | Really big ones are available, but 32 ounces is usually the high end for hiking water bottles. | Available in lots of sizes, including some bigger than 32 ounces. | The easiest way to carry large amounts of water, these bladders can be as large as 100 ounces or more. |
| Ease of Use | Very easy to use. | Can be annoying to fill if they don’t stand up well. | Requires a way to get the hose to your mouth- if you don’t have a specialized pocket in your backpack, you may have to improvise. Also, these can be difficult to fill at water sources. |
| Ease of Cleaning | Very- you can toss most of these in the dishwasher | Pretty easy. They might not work well in the dishwasher, but they’re not hard to keep clean. | Narrow openings require cleaning tablets or specialized tools. |
If you want to make sure you have a lot of water with you at all times, a hydration bladder might be your best bet. These bladders distribute the weight of water evenly, making it more comfortable to carry a large amount of water. You can carry a second type of bottle with you for backup.
Another option is treating the hydration bladder as your backup source, and have a collapsible or hard water bottle as your main way to carry drinking water. These bottles are easier to fill and attach more easily to a filter, making your refilling stops more manageable.
What If I Didn’t Bring Enough Water?
If you don’t bring enough water on an easy-paced day hike, it’s annoying, but probably not all that dangerous. If you don’t bring enough water on a multi-day trip through, say, Death Valley, it can be fatal. Assessing a water emergency is an important ability to have when you hike!
First, you need to be aware of the signs of dehydration. These include:
- Dry mouth and extreme thirst
- Dark-colored urine
- Decreased urination
- Clammy/sticky or dry skin
- Fatigue and weakness
- Dizziness
- Headache
- Rapid heartbeat and breathing
- Sunken eyes
- Confusion or irritability
- Fainting
If you notice these symptoms in yourself or your hiking partners, stop and get into the shade immediately. If you have water, drink it in slow sips, not chugs. Try to get some electrolytes into the person showing signs of dehydration. If you don’t have enough water for electrolyte tablets, they can be eaten on their own– or you can try to get something salty into the person.
The severity of the emergency really depends on where you are and what the weather is doing. If you can reasonably make it to a water supply and the weather isn’t too hot, you can let the dehydrated person rest with their feet up for a while while you go, get more water, and then get them to drink. Even on hot days, rest, water, and electrolytes can help a person get back on the trail. But there are some emergencies that are truly worrisome: Emergencies that happen in extremely hot conditions or while you are a long distance from the nearest water source.
If you run out of water and you don’t know where the nearest source is (or if you’re near a source that’s gone dry), there are a few ways to find emergency water. In arid environments, green vegetation can be an indicator of water sources below the surface. Digging in the vicinity of green plants may reveal damp soil. Water tends to flow downhill, so check lower elevations and valleys for potential water sources. Finally, check rocks and crevices for signs of accumulated moisture; in some cases, you may be able to collect water.
Being able to locate water sources like nearby lakes, rivers, or ponds is one of the many important reasons you should carry a GPS and know how to use it. These sources also show up on paper maps, which don’t rely on batteries. Once you’ve located water, pause your hike and refill everything you have and make sure the dehydrated person is stabilised and feeling better before you start going again. Dehydration is also a sign that you should probably slow your pace, too.
Finally, if you can’t locate water, this is what your emergency equipment is for. Call or radio for help, or use your personal locator beacon. Severe dehydration can lead to heat stroke, hypothermia, and even death. If you can’t locate emergency water quickly, it’s not worth putting you and your partners in even more danger.
Ultimately, dehydration is something to watch out for– but if you plan your hike well and are smart about not hiking during the hottest part of the day, water management doesn’t have to be hard. Just remember that you can’t always take all of it with you– and in fact, you don’t have to!

Max DesMarais is the founder of hikingandfishing.com. He has a passion for the outdoors and making outdoor education and adventure more accessible. Max is a published author for various outdoor adventure, travel, and marketing websites. He is an experienced hiker, backpacker, fly fisherman, backcountry skier, trail runner, and spends his free time in the outdoors. These adventures allow him to test gear, learn new skills, and experience new places so that he can educate others. Max grew up hiking all around New Hampshire and New England. He became obsessed with the New Hampshire mountains, and the NH 48, where he guided hikes and trail runs in the White Mountains. Since moving out west, Max has continued climbed all of the Colorado 14ers, is always testing gear, learning skills, gaining experience, and building his endurance for outdoor sports. You can read more about his experience here: hikingandfishing/about